Kotlin, Language, Software Development

Java to Kotlin

Main

Make a new Kotlin project, I’m using IntelliJ. In src make a main.kt file. Start with the equivalent main class as we would in Java. Declare a function with fun. Print Hello World. Notice you leave out the semi-colons. Note: when we don’t declare a class in Kotlin, the Kotlin compiler will generate one for you.

fun main(args: Array<String>) {
    println("Hello World")
}

Classes and Fields

Make an Employee.kt file. Declare an Employee class. Declare a field called name by using the var keyword. Declare it of type string. Fields have to be initialised in Kotlin so initialise it with an empty string:

class Employee {
    var name: String = ""
}

New

Now add to the main. Notice we don’t have to use the new keyword to instantiate an Employee:

    var employee = Employee()

String Interpolation

Kotlin will recognise ${} as string interpolation:

      employee.name = "Jack"
      println("My name is ${employee.name}")

Variables: Mutable or Immutable

Variables can be declared with var (mutable) or val (immutable). If we had declared name to be a val as below:

class Employee {
    val name: String = ""
}

Then it would be immutable, and we would get an error when we tried to reassign it in our main:

Constructors

Kotlin classes also support constructors. Change the Employee class so that it declares a constructor:

class Employee(var name: String) {
    //var name: String = ""
}

Now in the main class we can remove the below line:

    //employee.name = "Jack"

Instead we will pass “Jack” in the new Person constructor:

    var employee = Employee("Jack")

Public by default

The default access modifier in Kotlin is public. If we add a function to Employee:

    fun printEmployeeName() {
        println("Display: $name")
    }

We can call it from a different location:

    employee.printEmployeeName()

If / Else

In Kotlin If / Else can be used as an expression that will return a value. We can then assign that value to a variable:

    var message = if(employee.name == "Jack") {
        "Correct"
    } else {
        "Incorrect"
    }
    println(message)

Nulls

Kotlin tries to protect us against null values. It does that by requiring we explicitly state if something can take on a null value. In a new Question class we do that with a question mark to state our answer field might be null:

class Question {
    var answer: String? = null
}

In our main we can instantiate our Question like this:

    var q = Question()

Or if we want to state that our Question instance might be null we can do so:

    var q: Question? = Question()

If we had declared a Question instance that couldn’t be null we could have instantiated our answer like below:

    var q = Question()
    q.answer = null

However as we are declaring that the Question instance could be null if we instantiated it as above we would be prompted by the IDE:

To fix this we’ll use what’s known as the Safe Operator. The Safe Operator says if it evaluates to not-null then perform the operation, but if it evaluates to null don’t perform the operation. So add in the Safe Operator question mark:

    q?.answer = null

When statement

Instead of a Switch statement Kotlin has a When statement:

    fun printResult() {
        when(answer) {
            correctAnswer -> println("That's correct")
            else -> println("That's incorrect")
        }
    }

Try

Like If/Else, the Try statement in Kotlin is also an expression. Below are examples of its use, first with non-null input:

    var answerAsNumber: Int = try{
        Integer.parseInt(q?.answer)
    } catch (e: NumberFormatException) {
        -1
    }

And also with null input:

    var answerAsNumberNull: Int? = try{
        Integer.parseInt(q?.answer)
    } catch (e: NumberFormatException) {
        null
    }

Ranges

Ranges are a useful tool in Kotlin. You can have a range over anything that implements the comparable interface: integers, characters, etc:

    var myNum = 1..5
    var myChar = 'a'..'e'

    for (i in myNum) {
        print(i)
    }

    for (i in myChar) {
        print(i)
    }

Loops

While and do loops are quite similar in Kotlin. However For loops are slightly different. To iterate over a list:

    var numbers = listOf(1, 2, 3, 4, 5)

    for(i in numbers) {
        println(i)
    }

To iterate over a list and return the index:

    for((index, element) in numbers.withIndex()) {
        println("$element at $index")
    }

To iterate over a range:

    for(i in 1..10) {
        print(i)
    }

Ranges can be closed ranges, i.e. inclusive ranges. In Java we are used to a half-closed range. For Kotlin you can use a half closed range by using until:

    for(i in 1 until 10) {
        println(i)
    }

By using step we can define a step between the values:

    for(i in 1..10 step 2) {
        println(i)
    }

To iterate in reverse order, use downTo instead of ..

    for(i in 10 downTo 1) {
        println(i)
    }

To iterate over a map:

    var ages = TreeMap<String, Int>()
    ages["Tom"] = 23
    ages["Lisa"] = 43
    ages["Alex"] = 71

    for((firstName, age) in ages) {
        println("My name is $firstName and I am $age years old")
    }

Exceptions

Another thing Kotlin simplifies is the use of exceptions. For example if we look at the read method for FileReader, we can see in the SE 8 documentation it throws an I/O exception.

However in Kotlin we don’t have to catch or re-throw this exception. Kotlin essentially uses unchecked exceptions. This means we don’t have to specify that any class throws an exception and we don’t have to catch exceptions in Kotlin.

    var reader = FileReader("filename")
    reader.read()

That’s it! I hope this is helpful, my GitHub is linked below with the topic we’ve just discussed. I’ve also linked Kotlin Fundamentals by Kevin Jones with more information.

Standard
Software Development

Simple RESTful CRUD with Spring Boot, MySQL, Maven and Postman.

To begin go to https://start.spring.io/. You can leave the items that are already selected (Language, Project, Spring Boot version) and just change the Project Metadata (Group and Artifact):

Add Dependencies (Spring Web, Spring Data JPA, MySQL Driver, Spring Boot DevTools):

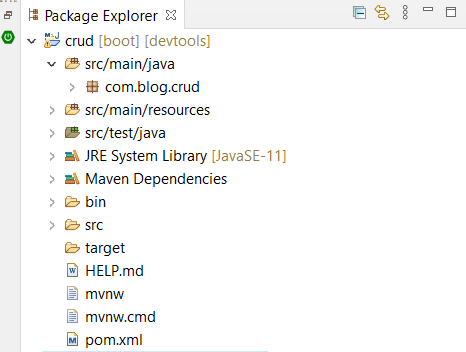
Once that’s done, click Generate. Extract the zipped files and open the project in your IDE (I’m using Spring Tools Suite). It should look like this:

For Source Control you can make a local repository by right clicking the project -> Team -> Share Project and setting up your repository. You can then push it to your remote Source Control of choice, I’m using GitHub.

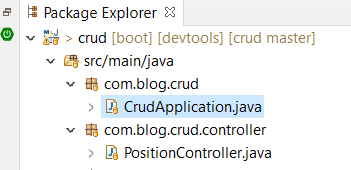
Next we’re going to add to src/main/java with a number of packages. Add in a Controller, Domain, Repository, Service. Now add a Java class to each package. This CRUD app will be about jobs so I will be naming them accordingly. Now they will look like below:

Now we’re going to add code to our Java classes.

Controller

Our PositionController looks like this:

package com.blog.crud.controller;

public class PositionController {

}

Add in Spring convenience annotation @RestController and @RequestMapping to add in the first part of our URI:

@RestController
@RequestMapping("/position")
public class PositionController {

Add annotations to handle our HTTP requests:

	@GetMapping("/getAllPositions")
	public List getAllPositions() {
		return positionService.getAllPositions();
	}	

	@PostMapping("/createPosition")
	public Position createPosition(@Valid @RequestBody Position position) {
		return positionService.createPosition(position);
	}

	@GetMapping("/getPosition/{id}")
	public Position getPositionById(@PathVariable (value = "id") Long positionId) {
		return positionService.getPositionById(positionId);
	}

	@PutMapping("/updatePosition/{id}")
	public Position updatePositionById(@PathVariable (value = "id") Long positionId, @Valid @RequestBody Position positionDetails) {
		return positionService.updatePositionById(positionId, positionDetails); 
	}

	@DeleteMapping("/deletePosition/{id}")
	public ResponseEntity deletePositionById(@PathVariable (value = "id") Long positionId) {
		return positionService.deletePositionById(positionId);
	}

Add in postitionService as a bean:

	@Autowired
	PositionService positionService;

Service

Our Service class looks like this:

package com.blog.crud.service;

public class PositionService {

}

Annotate with @Service for auto-detection:

@Service
public class PositionService {

Add service methods which will do work when called on by the controller.

public List<Position> getAllPositions() {
		return positionRepository.findAll();
	}
	
	public Position createPosition(Position position) {
		return positionRepository.save(position);
	}

	public Position getPositionById(Long positionId) {
		return positionRepository.getOne(positionId);
	}

	public Position updatePositionById(Long positionId, @Valid @RequestBody Position positionDetails) {
		Position position = getPositionById(positionId);
		position.setTitle(positionDetails.getTitle());
		position.setLevel(positionDetails.getLevel());
		position.setSalary(positionDetails.getSalary());
		
		Position updatedPosition = positionRepository.save(position);
		return updatedPosition;
	}

	public ResponseEntity<?> deletePositionById(Long positionId) {
		Position position = getPositionById(positionId);
		positionRepository.delete(position);
		
		return ResponseEntity.ok().build();
	}	

Add in positionRespository as a bean:

	@Autowired
	PositionRepository positionRepository;

Repository

Our Repository looks like this:

package com.blog.crud.repository;

public class PositionRepository {
}

Annotate with @Repository for auto-detection and to catch persistence specific exceptions. Change class to interface.

Extend the JPA interface to take advantage of the ready made CRUD methods:

@Repository
public interface PositionRepository extends JpaRepository<Position, Long> {			
}

Domain

Our Domain looks like this:

package com.blog.crud.domain;

public class Position {
}

Annotate with @Entity so that JPA is aware of it. An Entity represents a table stored in a database. The Hibernate annotation @Table is used to define the details of our table. Implement Serializable:

@Entity
@Table(name = "position")
public class Position implements Serializable{

Add the below:

	@Id
	@GeneratedValue(strategy = GenerationType.IDENTITY)
	private Long id;
	
	public Long getId() {
		return id;
	}

	public void setId(Long id) {
		this.id = id;
	}
	
    @NotBlank
    @Column(length=50)
	private String title;
    
	public @NotBlank String getTitle() {
		return title;
	}
	public void setTitle(@NotBlank String title) {
		this.title = title;
	}
    
    @Column(length=50)
	private String level;	

	public String getLevel() {
		return level;
	}
	public void setLevel(String level) {
		this.level = level;
	}
	
	private int salary;
	
	public int getSalary() {
		return salary;
	}
	public void setSalary(int salary) {
		this.salary = salary;
	}
	
	public Position(Long id, String title, String level, int salary) {
		this.setId(id);
		this.setTitle(title);
		this.setLevel(level);
		this.setSalary(salary);
	}

	public Position() {
		
	}

Connecting local MySQL

Setup MySQL. If you have that already skip this section. There’s a good guide here: https://ladvien.com/data-analytics-mysql-localhost-setup/

Once that’s set up, create a database to use (also in the above guide). My database will be called positiondb.

In order to connect local MySQL to our Spring application, open application.properties.

Add in the below (for PLACEHOLDER add in your username and password):

spring.datasource.driver-class-name=com.mysql.cj.jdbc.Driver
spring.datasource.url=jdbc:mysql://127.0.0.1:3306/positiondb?useUnicode=true&useJDBCCompliantTimezoneShift=true&useLegacyDatetimeCode=false&serverTimezone=UTC
spring.datasource.username=PLACEHOLDER
spring.datasource.password=PLACEHOLDER
spring.jpa.show-sql=true
spring.jpa.hibernate.ddl-auto=update
spring.jpa.properties.hibernate.dialect=org.hibernate.dialect.MySQL5Dialect
server.port=8080
spring.jackson.serialization.FAIL_ON_EMPTY_BEANS=false

Maven

In order to use annotations like @Valid and @NotBlank we’ll need to add a dependency to our POM. I have linked this here so you can pick an up to date one and paste this into your POM as shown below: https://mvnrepository.com/artifact/org.springframework.boot/spring-boot-starter-validation

@NotBlank Bean Validation will ensure the field will not be blank. When @Valid is used the target argument is checked. If it fails Spring Boot throws a MethodArgumentNotValidException.

Running

Right click the application as shown below and click Run As -> Spring Boot App:

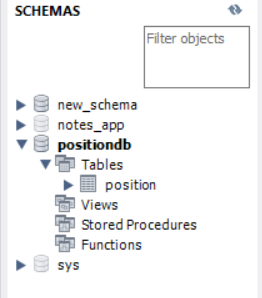
You may need to refresh your Database, but you should now have a new table in positiondb:

Postman

In the Postman app we can send HTTP requests and our Spring application will populate our MySQL database accordingly. Start the Spring app and open Postman.

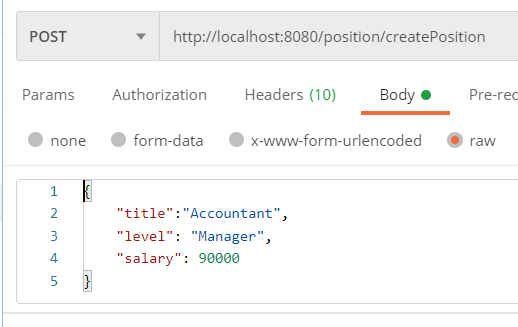
Create Position – select POST, the URI and Body should look like the below. We don’t need to add an id field because we opted in Domain for this to be automatically generated.

Once we click Send in Postman and refresh our positiondb we can run a query to see this has been added to our table:

Get Position – We can return the information using a GET request with the below URI and the id parameter:

Update Position – We can update the information using a PUT request with the below URI and the id parameter:

And when we run our SQL query again we can see this change was reflected in our database:

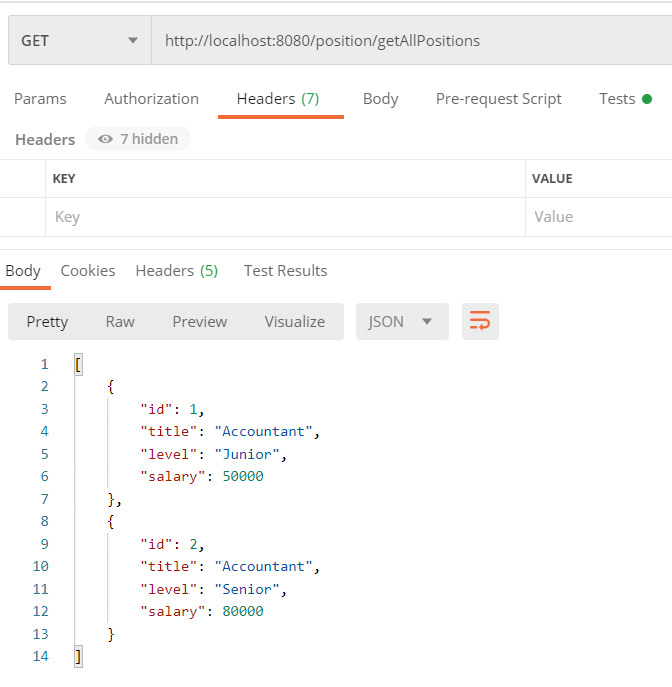
Get All Positions – I’ve added another position so we can see how this differs from Get Position. As below we use a GET request.

And again, we can see this change in our database when we run our query:

Delete Position – Lastly I have run Delete Position with the below URI:

And when we run the query in our database we can see the record with id 2 was removed:

And that’s it! I hope this is helpful, my GitHub is linked below with the Spring Application we’ve just discussed. Baeldung is also a great resource for Spring related queries.

Standard